写在前面
1、源码(.Net Core 2.2)
git地址:https://github.com/yizhaoxian/CoreIdentityServer4Demo.git
2、相关章节
2.1、《IdentityServer4 (1) 客户端授权模式(Client Credentials)》
2.2、《IdentityServer4 (2) 密码授权(Resource Owner Password)》
2.3、《IdentityServer4 (3) 授权码模式(Authorization Code)》
2.4、《IdentityServer4 (4) 静默刷新(Implicit)》
2.5、《IdentityServer4 (5) 混合模式(Hybrid)》
3、参考资料
IdentityServer4 中文文档 /> IdentityServer4 英文文档 https://identityserver4.readthedocs.io/en/latest/
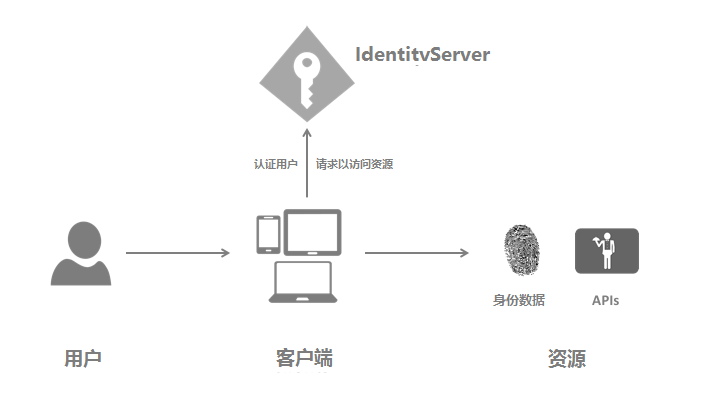
4、流程图
此文章是在上一篇文章的基础上继续修改的,基础代码请查看上一篇文章《IdentityServer4(1)客户端授权模式》
密码授权模式,允许一个客户端发送用户名和密码到令牌服务并获得一个表示该用户的访问令牌(AccessToken),这里多了一个概念就是【用户】,账号密码需要用户提供给客户端

一、IdentityServer修改
1、添加一个新的客户端,IdpConfig.GetClients()
new Client { // 客户端ID 这个很重要 ClientId = "client pwd", //资源所有者密码授权客户端定义 AllowedGrantTypes = GrantTypes.ResourceOwnerPassword, // 用于认证的密码 ClientSecrets = { new Secret("secret".Sha256()) }, // 客户端有权访问的范围(Scopes) AllowedScopes = { "api1", IdentityServerConstants.StandardScopes.OpenId, IdentityServerConstants.StandardScopes.Profile, IdentityServerConstants.StandardScopes.Address, IdentityServerConstants.StandardScopes.Email, IdentityServerConstants.StandardScopes.Phone } }2、添加测试用户
新建一个类 TestUsers.cs
public class TestUsers { public static List<TestUser> Users { get { var address = new { street_address = "ChaoYang", locality = "BeiJing", postal_code = 10010, country = "China" }; return new List<TestUser> { new TestUser { SubjectId = "818727", Username = "alice", Password = "alice", Claims = { new Claim(JwtClaimTypes.Name, "TestUser.Alice Smith"), new Claim(JwtClaimTypes.GivenName, "TestUser.Alice"), new Claim(JwtClaimTypes.FamilyName, "TestUser.Smith"), new Claim(JwtClaimTypes.PhoneNumber, "TestUser.13812345678"), new Claim(JwtClaimTypes.Email, "TestUser.AliceSmith@email.com"), new Claim(JwtClaimTypes.EmailVerified, "true", ClaimValueTypes.Boolean), new Claim(JwtClaimTypes.WebSite, "TestUser >"), new Claim(JwtClaimTypes.Address, JsonConvert.SerializeObject(address), IdentityServerConstants.ClaimValueTypes.Json) } }, new TestUser { SubjectId = "88421113", Username = "bob", Password = "bob", Claims = { new Claim(JwtClaimTypes.Name, "Bob Smith"), new Claim(JwtClaimTypes.GivenName, "Bob"), new Claim(JwtClaimTypes.FamilyName, "Smith"), new Claim(JwtClaimTypes.Email, "BobSmith@email.com"), new Claim(JwtClaimTypes.EmailVerified, "true", ClaimValueTypes.Boolean), new Claim(JwtClaimTypes.WebSite, ""), new Claim(JwtClaimTypes.Address, JsonConvert.SerializeObject(address), IdentityServerConstants.ClaimValueTypes.Json) } } }; } } }3、注册相关信息
StartUp.cs 添加测试用户和用户认证信息
public void ConfigureServices(IServiceCollection services) { services.AddIdentityServer() .AddDeveloperSigningCredential() //添加测试用户 .AddTestUsers(TestUsers.Users) //添加用户认证信息 .AddInMemoryIdentityResources(IdpConfig.GetApiResources()) .AddInMemoryApiResources(IdpConfig.GetApis()) .AddInMemoryClients(IdpConfig.GetClients()); services.AddMvc().SetCompatibilityVersion(CompatibilityVersion.Version_2_2); }二、API修改
1、修改 SuiBianController Get() 返回内容
随意这里改不改无所谓,因为我下面截图,和上一篇对不上 所以在这里说明一下
[HttpGet] public IActionResult Get() { return new JsonResult(from c in User.Claims select new { c.Type, c.Value }); }三、客户端修改
1、添加一个 Action 请求 AccessToken
public async Task<IActionResult> TokenPwd() { var client = new HttpClient(); var disco = await client.GetDiscoveryDocumentAsync(_idpBaseUrl); if (disco.IsError) { return Content("获取发现文档失败。error:" + disco.Error); } #region 第一种方式请求 token //var tokenclient = new TokenClient(client, new TokenClientOptions //{ // ClientId = "client pwd", // ClientSecret = "secret", // Address = disco.TokenEndpoint, //}); //var token = await tokenclient.RequestPasswordTokenAsync("alice", "alice", "api1");
No comments:
Post a Comment