深入了解一些Android动画
一、PropertyValuesHolder
阅读本文需要上一文Android属性动画的基础,这样才可以明白接下来要讲什么。
1.理解和使用
PropertyValuesHolder 是ObjectAnimation类似的一个方法,只是少了一个target,就是要执行的控件。看看正常的使用方法:会同时执行全部的Holder
public void doPropertyValuesHolder(){ //定义一个旋转Holder PropertyValuesHolder rotationHolder= PropertyValuesHolder.ofFloat( "rotation", 60f,40f,100f,-60f,40f,88f,77f); //定义一个透明Holder PropertyValuesHolder alphaHolder= PropertyValuesHolder.ofFloat( "alpha", 0.01f,0.5f,1.0f,0.8f,0.2f,0.0f); //加载进ObjectAnimator ObjectAnimator objectAnimator=ObjectAnimator.ofPropertyValuesHolder(ballImageView,rotationHolder,alphaHolder); objectAnimator.setDuration(3000); objectAnimator.start(); }2.方法和参数
可以看看这个方法的参数:
ObjectAnimator ofPropertyValuesHolder(Object target,PropertyValuesHolder... values)PropertyValuesHolder ofFloat(String propertyName, float... values)Object target 是要显示动画的控件
PropertyValuesHolder... values 装载多个PropertyValuesHolder
String propertyName 代表要反射的参数,跟ObjectAnimation的参数是一样的
float... values 代表是可变长参数
这样的方法还有以下图片这些:
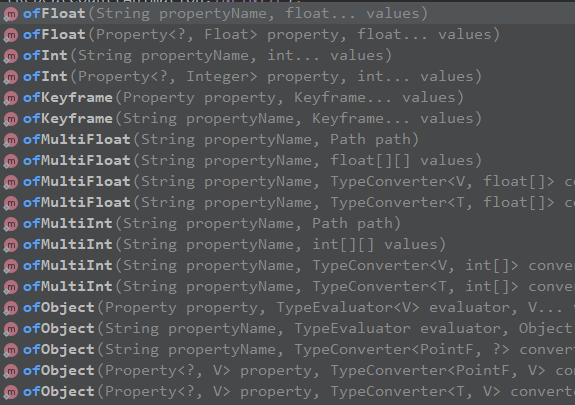
其中ofObject()方法 ,也是跟ObjectAnimation的相似,也是要自定义TypeEvaluator。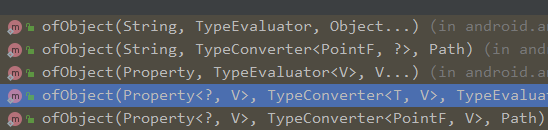
二、Keyframe
1.理解和使用
看名字,就是理解为关键帧的意思,在动画中,在某帧做一些操作,从而实现对比效果比较明显的效果。
关键帧表示是某个物体在哪个时间点应该在哪个位置上。
具体使用:
public void doPropertyValuesHolderKeyFrame(){ //头keyframe1,从进度0.6开始,在进度60%的时候,数值是0.1f Keyframe keyframe1=Keyframe.ofFloat(0.6f,0.1f); //中间keyframe2 Keyframe keyframe2=Keyframe.ofFloat(0.1f,0.8f); //尾部keyframe3,以50%进度作为结束,这时候的数值为0.2f Keyframe keyframe3=Keyframe.ofFloat(0.5f,0.2f); //装载到Holder中,并设置要反射的方法,这是反射的是setAlpha()方法,控制透明度 PropertyValuesHolder alphaHolder=PropertyValuesHolder.ofKeyframe("alpha",keyframe1,keyframe2,keyframe3); //把装载到Holder中装载到ObjectAnimator或者ValueAnimation ObjectAnimator objectAnimator=ObjectAnimator.ofPropertyValuesHolder(ballImageView,alphaHolder); objectAnimator.setDuration(3000); objectAnimator.start(); }2.方法和参数
Keyframe ofFloat(float fraction, float value)float fraction 表示进度
float value 表示在这个进度下的数值
PropertyValuesHolder ofKeyframe(String propertyName, Keyframe... values)String propertyName 要反射的set方法
Keyframe... values 传入Keyframe
Keyframe的方法,也是和其他的类似的。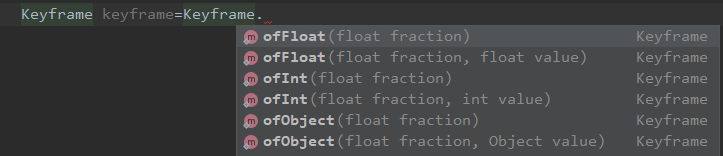
Keyframe的set方法,设置进度,插值器,数值。
没有设置插值器的时候,默认是线性插值器
keyframe1.setInterpolator(new LinearInterpolator()); //默认线性插值器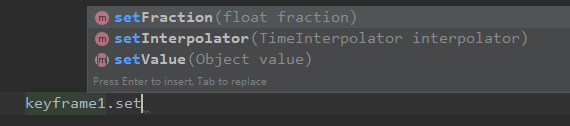
3.帧的操作
直接写结论:
- 如果去掉0帧,则以第一个关键帧为起始位置
- 如果去掉结束帧(进度为1),则以最后一个关键帧为结束位置
- 使用keyframe来构建动画,至少需要2帧
三、ViewPropertyAnimator
1.理解和使用
可以通过串行的形式,快速定义动画,省去一些定义,在每次界面绘制的时候,启动动画,比其他的更节省消耗。
比如:
ballImageView.animate().alpha(0.5f).rotation(360f).scaleX(1.5f).translationX(100f);2.参数和方法
可以看到这些方法的返回值,基本都是ViewPropertyAnimator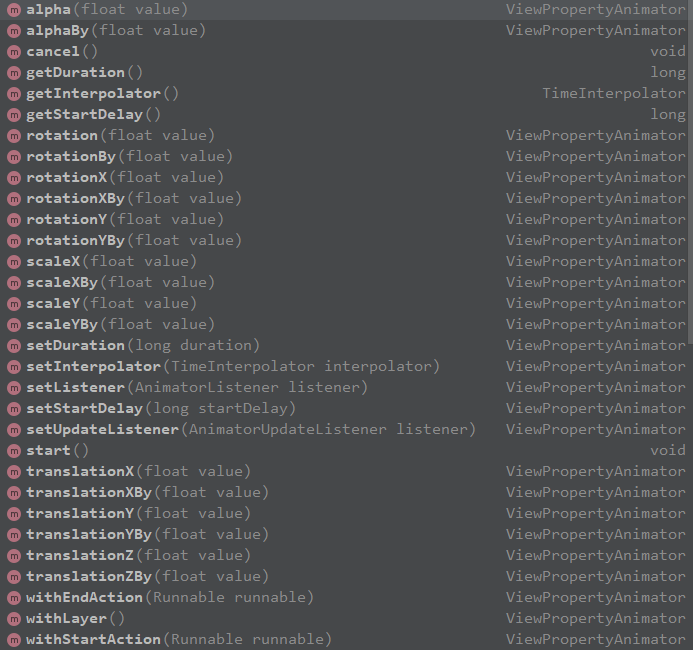

再引用一张表格:
| 函数 | 含义 |
|---|---|
| alpha(float value) | 设置透明度 |
| scaleY(float value) | 设置 Y轴方向的缩放大小 |
| scaleX(float value) | 设置X轴方向的缩放大小 |
| translationY(float value) | 设置Y轴方向的移动值 |
| translationX(float value) | 设置X轴方向的移动值 |
| rotation(float value) | 设置绕Z轴旋转度数 |
| rotationX(float value) | 设置绕x轴旋转度数 |
| rotationY(float value) | 设置绕 Y 轴旋转度数 |
| x(float value) | 相对于父容器的左上角坐标在 X轴方向的最终位置 |
| y(float value) | 相对于父容器的左上角坐标在Y轴方向的最终位置 |
| alphaBy(float value) | 设置透明度增量 |
| rotationBy(float value) | 设置绕Z轴旋转增量 |
| rotationXBy(float value) | 设置绕 X 油旋转增量 |
| rotationYBy(float value) | 设置统Y轴旋转增量 |
| translationXBy(float value) | 设置X轴方向的移动值增量 |
| translationYBy(float value) | 设置Y轴方向的移动值增量 |
| scaleXBy(float value) | 设置X轴方向的缩放大小增量 |
| scaleYBy(float value) | 设置 Y轴方向的缩放大小增量 |
| xBy(float value) | 相对于父容器的左上角坐标在 X轴方向的位置增量 |
| yBy(float value) | 相对于父容器的左上角坐标在 Y轴方向的位置增量 |
| setlnterpolator(Timelnterpolator interpolator) | 设置插值器 |
| setStartDelay(long startDelay) | 设置开始延时 |
| setDuration(long duration) | 设置动画时长 |
四、animateLayoutChanges
android:animateLayoutChanges="true"
在Layout加入控件,或者移除控件的时候,添加动画,但是只能使用默认动画。
<LinearLayout android:animateLayoutChanges="true" android:layout_width="match_parent" android:layout_height="match_parent" android:orientation="vertical"/>五、LayoutTransition
LayoutTransition可以控制ViewGroup的动画,可以使用自定义的动画。
具体使用:
public void doLayoutTransition(){ LinearLayout linearLayout=new LinearLayout(this); //1.创建实例 LayoutTransition transition=new LayoutTransition(); //2.创建动画 ObjectAnimator objectAnimator=ObjectAnimator.ofFloat(null,"rotation",0f,90f,0f); //3.动画出现形式进行设置 transition.setAnimator(LayoutTransition.DISAPPEARING,objectAnimator); //4.将LayoutTransition设置到ViewGroup中 linearLayout.setLayoutTransition(transition); //5.开源动画库 NineOldAndroids }setAnimator(int transitionType, Animator animator)
这个方法中,transitionType有五个选项
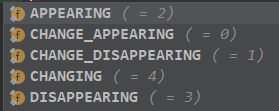
CHANGE_APPEARING 由于容器中要显示一个新的元素,其他需要变化的元素所应用的动画(问题多,不常用)
_CHANGE_DISAPPEARING_ 当个容器中某个元素要消失时,其他需要变化的元素所应用的动画(问题多,不常用)
_CHANGING_ 容器中正在更改的元素的动画变化
_APPEARING_ 元素在容器中出现时所定义的动画
_DISAPPEARING_ 元素在容器中消失时所定义的动画
六、PathMeasure
PathMeasure类似一个计算器,可以计算出目标path的坐标,长度等
1.初始化
public void doPathMeasure(){ Path path=new Path(); //初始化方法1 PathMeasure pathMeasure1=new PathMeasure(); pathMeasure1.setPath(path,true); //初始化方法2 PathMeasure pathMeasure2=new PathMeasure(path,false); }setPath(Path path, boolean forceClosed)path 就是代表要计算的目标Path。forceClosed 是否闭合,true会计算闭合状态下的Path,false会按照Path原来情况来计算。
2.函数调用
自定义一个view
public class PathView extends View { Path mPath; Paint mPaint; PathMeasure mPathMeasure; public PathView(Context context, @Nullable AttributeSet attrs) { super(context, attrs); mPath=new Path(); mPaint=new Paint(); mPathMeasure=new PathMeasure(); } @Override protected void onDraw(Canvas canvas) { super.onDraw(canvas); canvas.translate(250,250); //画布移动 mPaint.setColor(Color.BLUE); //画笔颜色 mPaint.setStrokeWidth(5); //画笔粗细 mPaint.setStyle(Paint.Style.STROKE); //画笔风格 mPath.moveTo(0,0); mPath.lineTo(0,100); mPath.lineTo(100,100); mPath.lineTo(100,0); mPathMeasure.setPath(mPath,true); Log.v("showLog", "getLength()=="+mPathMeasure.getLength() +" isClosed()=="+ mPathMeasure.isClosed()); //结果400.0 true mPathMeasure.setPath(mPath,false); Log.v("showLog", "getLength()=="+mPathMeasure.getLength() +" isClosed()=="+ mPathMeasure.isClosed()); //结果300.0 false canvas.drawPath(mPath,mPaint); //绘制路径 }}绘制效果:

2.1 PathMeasure.getLength()
PathMeasure.getLength() 函数用于测量路径的长度
2.2 PathMeasure.isClosed()
PathMeasure.isClosed() 函数用于返回是否测量闭合状态
2.3 PathMeasure.nextContour()
mPath.addRect(-50, -50, 50, 50, Path.Direction.CW); canvas.drawPath(mPath, mPaint); mPath.addRect(-100, -100, 100, 100, Path.Direction.CW); canvas.drawPath(mPath, mPaint); mPath.addRect(-120, -120, 120, 120, Path.Direction.CW); canvas.drawPath(mPath, mPaint); mPathMeasure.setPath(mPath, false); do { float len = mPathMeasure.getLength(); Log.v("showLog", "len=" + len); } while (mPathMeasure.nextContour());效果:
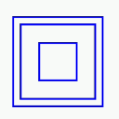
打印结果:
len=400.0len=800.0len=960.0PathMeasure.nextContour()得到的顺序与添加的Path的顺序相同
PathMeasure.getLength()只是得到当前path的长度,不是全部的长度
2.3 getSegment()
使用getSegment函数需要禁用硬件加速 在构造方法中加入setLayerType(LAYER_TYPE_SOFTWARE,null);
mPath.addRect(-50, -50, 50, 50, Path.Direction.CW); mPathMeasure.setPath(mPath,false); //计算的path mPathMeasure.getSegment(0,150,mDstPath,true); //截取并添加到mDstPath,是添加,不是其他 canvas.drawPath(mPath, mPaint); //绘制原来的path canvas.translate(200,0); //画布移动 mPaint.setColor(Color.RED); canvas.drawPath(mDstPath, mPaint); //绘制添加后的mDstPath boolean getSegment(float startD, float stopD, Path dst, boolean startWithMoveTo)startD path开始截取的点,截取的起始点,是以左上角的点开始的
stopD 截取停止的点
dst 截取后添加到的path
startWithMoveTo 是否保存原状,true保存原样,false则会连接初始点和终点,和原来的不一定相同形状
以上代码的效果: 截图的方向,与原来的path的生成方向有关

2.4 动态画圆的例子
代码:
public class PathView extends View { Path mPath, mDstPath; Paint mPaint; PathMeasure mPathMeasure; float mCurAnimValue; public PathView(Context context, @Nullable AttributeSet attrs) { super(context, attrs); setLayerType(LAYER_TYPE_SOFTWARE, null); mPath = new Path(); mDstPath = new Path(); mPaint = new Paint(); mPathMeasure = new PathMeasure(); mPaint.setColor(Color.BLUE); //画笔颜色 mPaint.setStrokeWidth(5); //画笔粗细 mPaint.setStyle(Paint.Style.STROKE); //画笔风格 mPath.addCircle(100, 100, 50, Path.Direction.CW); //一个完整的圆 mPathMeasure.setPath(mPath, true); //要计算的path ValueAnimator animator = ValueAnimator.ofFloat(0, 1); //进度 0~1 animator.setRepeatCount(ValueAnimator.INFINITE); //无限循环 animator.addUpdateListener(new ValueAnimator.AnimatorUpdateListener() { @Override public void onAnimationUpdate(ValueAnimator animation) { mCurAnimValue = (Float) animation.getAnimatedValue(); //得到当前的进度 invalidate();//重绘,重新执行onDraw()方法 } }); animator.setDuration(5000); animator.start(); } @Override protected void onDraw(Canvas canvas) { super.onDraw(canvas); canvas.translate(100, 100); //画布移动 float stop=mPathMeasure.getLength()*mCurAnimValue; //一个进度确定一个截取点 mDstPath.reset(); mPathMeasure.getSegment(0,stop,mDstPath,true); //一点点添加 canvas.drawPath(mDstPath,mPaint); //每次有进度更新,就绘制一小段截取 }}效果:
2.5 getPosTan()
先看看函数的定义:
boolean getPosTan(float distance, float pos[], float tan[]) float distance 距离path的其实长度
float pos[] 该点的坐标值。x和y pos[0]=x,pos[1]=y
float tan[] 该点的正切值。x和y pos[0]=x,pos[1]=y tan<a=y/x
2.6 箭头画圆的例子
代码:
public class PathView extends View { Path mPath, mDstPath; Paint mPaint; PathMeasure mPathMeasure; float mCurAnimValue; Bitmap mArrowBmp; float[] mPos; float[] mTan; int mCenterX,mCenterY; float mRadius; public PathView(Context context, @Nullable AttributeSet attrs) { super(context, attrs); setLayerType(LAYER_TYPE_SOFTWARE, null); mPath = new Path(); mDstPath = new Path(); mPaint = new Paint(); mPathMeasure = new PathMeasure(); mPos=new float[2]; mTan=new float[2]; //加载箭头图片 mArrowBmp= BitmapFactory.decodeResource(getResources(), R.drawable.arrow); mPaint.setColor(Color.BLUE); //画笔颜色 mPaint.setStrokeWidth(5); //画笔粗细 mPaint.setStyle(Paint.Style.STROKE); //画笔风格 mPath.addCircle(540, 972, 486, Path.Direction.CW); //一个完整的圆 mPathMeasure.setPath(mPath, true); //要计算的path ValueAnimator animator = ValueAnimator.ofFloat(0, 1); //进度 0~1 animator.setRepeatCount(ValueAnimator.INFINITE); //无限循环 animator.addUpdateListener(new ValueAnimator.AnimatorUpdateListener() { @Override public void onAnimationUpdate(ValueAnimator animation) { mCurAnimValue = (Float) animation.getAnimatedValue(); //得到当前的进度 invalidate();//重绘,重新执行onDraw()方法 } }); animator.setDuration(5000); animator.start(); } @Override protected void onSizeChanged(int w, int h, int oldw, int oldh) { /* * 得到h,w的最小的那个值; * >> 1 移位 跟 /2 相同; * 乘以0.9f,表示占布局的90% * */ mRadius = (Math.min(h, w) >> 1) * 0.9f; // 中心坐标 mCenterX = w / 2; mCenterY = h / 2; Log.v("showLog",mCenterX+" "+mCenterY+" "+mRadius); postInvalidate(); super.onSizeChanged(w, h, oldw, oldh); } @Override protected void onDraw(Canvas canvas) { super.onDraw(canvas); float stop=mPathMeasure.getLength()*mCurAnimValue; //一个进度确定一个截取点 mDstPath.reset(); mPathMeasure.getSegment(0,stop,mDstPath,true); //一点点添加 canvas.drawPath(mDstPath,mPaint); //每次有进度更新,就绘制一小段截取 mPathMeasure.getPosTan(stop,mPos,mTan); //获得每点的正切值和坐标 /** * Math.atan2(mTan[1],mTan[0])获得tan的弧度值 * *180.0/Math.PI将转化为角度值 * */ float degrees=(float)(Math.atan2(mTan[1],mTan[0])*180.0/Math.PI); Matrix matrix=new Matrix(); /** * 将图片围绕中心点旋转指定角度 * postRotate(float degrees, float px, float py) * degrees是角度 (px,py)是图片中心点 * */ matrix.postRotate(degrees,mArrowBmp.getWidth()/2,mArrowBmp.getHeight()/2); /** * 将图片从默认的(0,0)点移动到路径的最前端 * */ matrix.postTranslate(mPos[0]-mArrowBmp.getWidth()/2,mPos[1]-mArrowBmp.getHeight()/2); //绘制图片 canvas.drawBitmap(mArrowBmp,matrix,mPaint); }}效果:

2.7 getMatrix()
参数类型:
boolean getMatrix(float distance, Matrix matrix, int flags)使用方法:
//计算方位角 Matrix matrix = new Matrix(); //获取位置信息 mPathMeasure.getMatrix(stop,matrix,PathMeasure.POSITION_MATRIX_FLAG); //获取切边信息 mPathMeasure.getMatrix(stop,matrix,PathMeasure.TANGENT_MATRIX_FLAG); 2.8 支付成功例子
public class TickView extends View { Path mPath, mDstPath; Paint mPaint; PathMeasure mPathMeasure; float mCurAnimValue; int mCenterX, mCenterY; float mRadius; public TickView(Context context, @Nullable AttributeSet attrs) { super(context, attrs); setLayerType(LAYER_TYPE_SOFTWARE, null); mPath = new Path(); mDstPath = new Path(); mPaint = new Paint(); mPathMeasure = new PathMeasure(); mPaint.setColor(Color.BLUE); //画笔颜色 mPaint.setStrokeWidth(5); //画笔粗细 mPaint.setStyle(Paint.Style.STROKE); //画笔风格 mCenterX = 540; mCenterY = 972; mRadius = 486 / 2; /** * 圆 * */ mPath.addCircle(mCenterX, mCenterY, mRadius, Path.Direction.CW); /** * 对勾 * */ mPath.moveTo(mCenterX - mRadius / 2, mCenterY); mPath.lineTo(mCenterX, mCenterY + mRadius / 2); mPath.lineTo(mCenterX + mRadius / 2, mCenterY - mRadius / 3); mPathMeasure.setPath(mPath, false); //要计算的path ValueAnimator animator = ValueAnimator.ofFloat(0, 2); //进度 0~1 是圆,1~2是对勾 animator.setRepeatCount(ValueAnimator.RESTART); animator.addUpdateListener(new ValueAnimator.AnimatorUpdateListener() { @Override public void onAnimationUpdate(ValueAnimator animation) { mCurAnimValue = (Float) animation.getAnimatedValue(); //得到当前的进度 invalidate();//重绘,重新执行onDraw()方法 } }); animator.setDuration(5000); animator.start(); } @Override protected void onSizeChanged(int w, int h, int oldw, int oldh) { /* * 得到h,w的最小的那个值; * >> 1 移位 跟 /2 相同; * 乘以0.9f,表示占布局的90% * */ mRadius = (Math.min(h, w) >> 1) * 0.9f; // 中心坐标 mCenterX = w / 2; mCenterY = h / 2; Log.v("showLog", mCenterX + " " + mCenterY + " " + mRadius); postInvalidate(); super.onSizeChanged(w, h, oldw, oldh); } @Override protected void onDraw(Canvas canvas) { super.onDraw(canvas); if (mCurAnimValue < 1) { float stop = mPathMeasure.getLength() * mCurAnimValue; mPathMeasure.getSegment(0, stop, mDstPath, true); } else if (mCurAnimValue == 1) { mPathMeasure.getSegment(0, mPathMeasure.getLength(), mDstPath, true); mPathMeasure.nextContour(); } else { float stop = mPathMeasure.getLength() * (mCurAnimValue - 1); mPathMeasure.getSegment(0, stop, mDstPath, true); } canvas.drawPath(mDstPath, mPaint); }}效果:
编程中我们会遇到多少挫折?表放弃,沙漠尽头必是绿洲。
No comments:
Post a Comment